Serverless Container Deployment with AWS Fargate

Serverless Container Deployment with AWS Fargate
Learn how to deploy serverless containers with AWS ECS on Fargate, leveraging the benefits of both serverless and containerization for a self-managed, scalable, and cost-efficient architecture.🚀
In This Article
- Prerequisites
- What Is Serverless?
- Exploring AWS Elastic Container Service
- Deploying Our First Container on Fargate
- Distributing Traffic With AWS ELB
- Conclusion
Prerequisites
Before we set sail on this adventure, there are a few tools and concepts you should be familiar with. If you're already comfortable with these, great! If not, consider this your treasure map to the resources you need:
- Basic AWS Services Knowledge
AWS is our ship for this voyage. Familiarity with AWS services such as VPC, ELB, and CloudFormation is crucial to navigate through the ocean of containerized serverless computing. - Containerization Concepts Knowledge
To successfully implement serverless container computing, an understanding of containerization is key. Throughout this article we will use Docker and Docker Hub for containerization and container registry.
Let's start our journey towards hassle-free container deployment! 🚢
What is Serverless?
Our first stop in this journey is to understand serverless computing. Serverless is an architectural pattern that allows you to build and run applications without having to manage the underlying infrastructure. In a serverless environment, you just focus on writing code and deploying applications, while the cloud provider handles the provisioning, scaling, and managing infrastructure. AWS Lambda is a popular example of a serverless service.
But what if you want the power of serverless for your containerized applications? That's where AWS Fargate comes into play. AWS Fargate brings the serverless model to container deployment and management, offering the best of both worlds.
Exploring AWS Elastic Container Service
AWS Elastic Container Service (ECS) is a managed service that simplifies the process of running, deploying, and managing containerized applications. When combined with AWS Fargate, it allows you to run your containers in a serverless manner. It integrates with multiple Docker registries such as AWS ECR and Docker Hub, allowing you to easily deploy and manage containers on AWS.
With ECS on Fargate, you don't have to worry about the underlying infrastructure for your containers. Just as with serverless compute services like Lambda, Fargate takes care of the provisioning, scaling, and managing of your container infrastructure, letting you focus on the application logic itself.
ECS Components
To better understand how ECS works and how it integrates with Fargate, it's essential to get familiar with its core components.
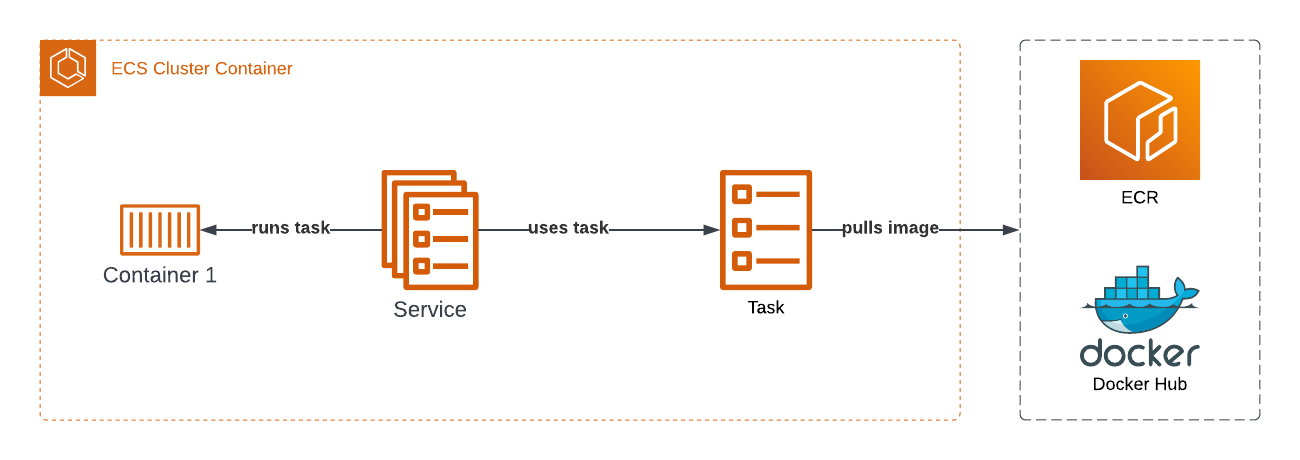
- Cluster
An ECS cluster is a logical group of tasks and services. It serves as a container orchestration platform where you can deploy and manage containerized applications. - Task Definition
A task definition is a blueprint that describes the container(s) required to run a task. It contains information such as the Docker image, CPU and memory requirements, environment variables, and any necessary network configurations. - Task
A task is an instantiation of a task definition. It is a single unit of work that runs within an ECS cluster. - Service
A service is a higher-level abstraction that allows you to maintain a specified number of running tasks within an ECS cluster. Services monitor task health and automatically replace unhealthy tasks to maintain the desired count. Services can also be integrated with load balancers to distribute traffic among the running tasks.
ECS Launch Types
Now when it comes to running the containers with ECS, AWS provides us with two options referred to as 'Launch Types':
| Launch Type | Description |
|---|---|
| EC2 | Deploy your ECS cluster on a set of self-managed EC2 instances. Provides you with more control over the underlying infrastructure but requires more management overhead as you need to manage and monitor the EC2 instances yourself. |
| Fargate | A fully managed service that allows you to run your containers without having to manage the underlying compute resources. AWS provisions and manages the compute resources, such as EC2 instances, networking, and scaling allowing you to focus on deploying and managing your containers without worrying about the underlying infrastructure. |
As you may have figured out already, the EC2 launch type requires more management overhead, although it may be beneficial when more control over the underlying container host is needed, it is not the most suitable option for our case. So for now enough talking, it's time to roll up our sleeves and get our hands a little bit dirty!
Deploying Our First Container On Fargate
To quickly get hands-on experience with AWS Fargate, we will start by deploying a sample web app. For this, we will use AWS CloudFormation to deploy a ready-made Docker image provided by AWS, and to keep things even simpler, we will use one public subnet (a subnet with an internet gateway route).

Now jumping to CloudFormation definition, we will focus on the ECS components part of the template.
We start by defining an ECS Cluster:
ECSCluster: Type: "AWS::ECS::Cluster" Properties: ClusterName: "DemoWebAppCluster"Next, will we have our task definition, if you remember the task definition is where we tell ECS what container images to run and the necessary resources that have to be provisioned for the container:
FargateTaskDefinition: Type: "AWS::ECS::TaskDefinition" Properties: Family: "FargateTask" ExecutionRoleArn: !Ref ECSTaskExecutionRole RequiresCompatibilities: - "FARGATE" # We use minimum possible resources Cpu: 256 Memory: 512 NetworkMode: "awsvpc" ContainerDefinitions: - Name: "WebAppContainer" Image: "amazon/amazon-ecs-sample" Essential: true PortMappings: - ContainerPort: 80Last but not least, we define the ECS Fargate service, which will take care of monitoring and scaling our containers according to the desired state:
FargateService: Type: "AWS::ECS::Service" Properties: ServiceName: "WebAppService" Cluster: !Ref ECSCluster LaunchType: "FARGATE" TaskDefinition: !Ref FargateTaskDefinition DesiredCount: 1 # Number of container replicas NetworkConfiguration: AwsvpcConfiguration: # Enable public IP assignment for demo purposes; # In production, consider using a NAT Gateway for internet access AssignPublicIp: "ENABLED" Subnets: - !Ref PublicSubnet1 SecurityGroups: - !Ref SecurityGroupLet's examine the process of deploying this stack. The complete CloudFormation template definition can be found on Github.
You have the option to use either the AWS CLI or the AWS Console, but I personally prefer to use the CLI:
aws cloudformation create-stack \ --stack-name ecs-fargate-stack \ --template-body file:///<path-to-template-directory>/ecs-sample.yaml \ --capabilities CAPABILITY_NAMED_IAMAfter executing this command, AWS CloudFormation will start creating the resources defined in the template, which include our ECS cluster, Fargate task definition, and the Fargate service.
To verify the status of our deployment, navigate to the ECS service in the AWS Management Console:
 Here, you will see the newly created
 DemoWebAppCluster and its tasks. Initially, the tasks may be in PENDING state while they are being created, but eventually, they should reach RUNNING state.
Next, navigate to the detailed view of the cluster:

Along with the cluster information overview at the top, there are separate tabs for Services, Tasks, Infrastructure, etc.. providing detailed insights into each aspect of the deployment.
In the "Tasks" tab, you'll see all the tasks that are part of the service. Clicking on a task ID will take you to a detailed page where you can find more information about the task, including the public IP which is what you'll use to access the deployed web application.
Here's what a Task page looks like:

If you navigate to this public IP address in your web browser, you will see the deployed application:

As you can see, deploying a web application on AWS Fargate using CloudFormation is a straightforward process. However, once your application starts receiving a substantial amount of traffic, you'll want to ensure that it can handle the load without any performance issues. let's see how we can achieve that.
Distributing Traffic With AWS ELB
In this section, we're going to integrate AWS ELB with our existing ECS on Fargate setup. We'll configure an Application Load Balancer(ALB) to distribute incoming traffic to our application, providing a robust, reliable service for our users.
To better illustrate the relationship and flow between ECS on Fargate and ELB, let's take a look at the following architectural diagram:
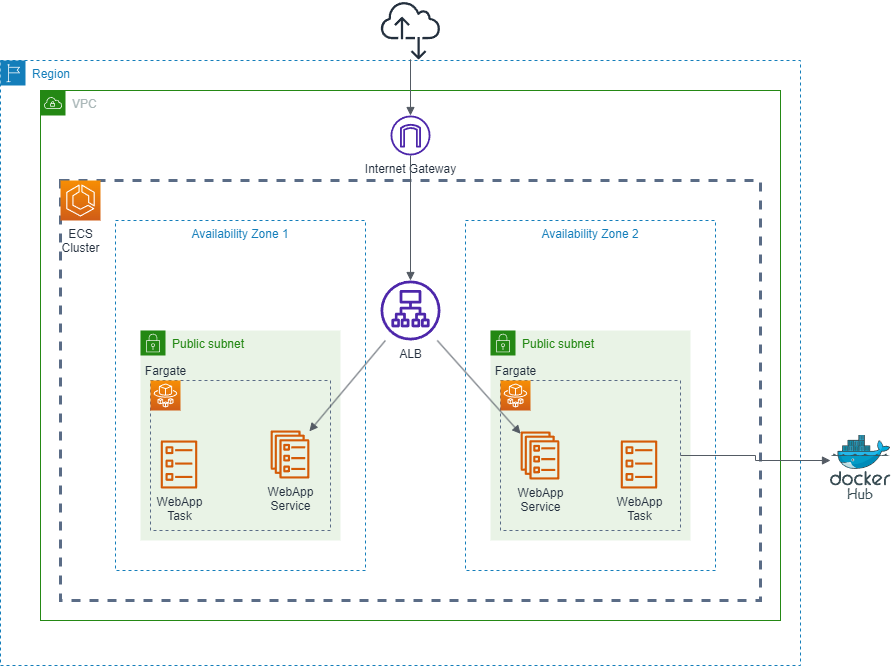
We first start by adding an additional Availability Zone (AZ). By spreading our resources across multiple AZs, we reduce the risk of our application becoming unavailable due to issues in a single location.
Next, we introduced an ALB, The ALB will sit in front of our ECS tasks, and its job will be to distribute incoming traffic across both Availability Zones. The ALB will also ensure that if one AZ experiences issues, traffic can be routed to the other.
Sounds simple, right? Now, it's time to tweak the CloudFormation template, but before that, let's change our Docker image a bit. We'll use the same base image - amazon/amazon-ecs-sample:latest. But, we'll add extra info to tells us which AZ our container runs in. It shows how the ALB distributes traffic:
FROM amazon/amazon-ecs-sample:latestRUN echo "<?php \ echo '<pre>'; \ \$metadata_url = getenv('ECS_CONTAINER_METADATA_URI_V4'); \ if (\$metadata_url) { \ \$response = file_get_contents(\$metadata_url); \ \$metadata = json_decode(\$response, true); \ \$pretty_json = json_encode(\$metadata, JSON_PRETTY_PRINT); \ echo \$pretty_json; \ } else { \ echo 'ECS_CONTAINER_METADATA_URI_V4 not set'; \ } \ echo '</pre>'; \?>" > /var/www/html/index.phpCMD ["/usr/sbin/httpd","-D","FOREGROUND"]We used ${ECS_CONTAINER_METADATA_URI_V4} container metadata endpoint to query information about the running container, then did some php magic to pretty print the response JSON.
No worries, to make things easy I've already built and published this image to Docker Hub. So, you don't have to do it yourself.
Next, let's adjust our CloudFormation template. We start by adding a second public subnet in a different AZ:
# Define our second public subnetPublicSubnet2: Type: "AWS::EC2::Subnet" Properties: VpcId: !Ref VPC CidrBlock: "10.0.1.0/24" # Use second AZ in the list, so both subnets are in different AZs AvailabilityZone: !Select [1, !GetAZs ""]# Add route table associationPublicSubnet2RouteTableAssociation: Type: "AWS::EC2::SubnetRouteTableAssociation" Properties: SubnetId: !Ref PublicSubnet2 RouteTableId: !Ref PublicRouteTableNext, we add our Load Balancer:
# Load BalancerLoadBalancer: Type: "AWS::ElasticLoadBalancingV2::LoadBalancer" Properties: Scheme: internet-facing Type: application Subnets: - !Ref PublicSubnet1 - !Ref PublicSubnet2 SecurityGroups: - !Ref SecurityGroup# Load Balancer ListenerLoadBalancerListener: Type: "AWS::ElasticLoadBalancingV2::Listener" Properties: LoadBalancerArn: !Ref LoadBalancer Port: 80 Protocol: HTTP DefaultActions: - Type: forward TargetGroupArn: !Ref TargetGroupOur ECS resources also need tweaking to use the new Docker image and to run two containers across both subnets:
FargateTaskDefinition: # ...props ContainerDefinitions: Image: "wassimoo/ecs-fargate-sample" # Use the adjusted docker imageFargateService: DependsOn: - LoadBalancerListener # Wait for ELB to be created Properties: #...props DesiredCount: 2 # Run two containers instead of 1 NetworkConfiguration: AwsvpcConfiguration: # ...VPC configs Subnets: - !Ref PublicSubnet1 - !Ref PublicSubnet2With the ALB now in place, we'll no longer rely on the public IP of the ECS task to access our application. Instead, we'll use the ALB. To get the DNS of the ALB, which is reserved for us by AWS, we add an Output section to our template:
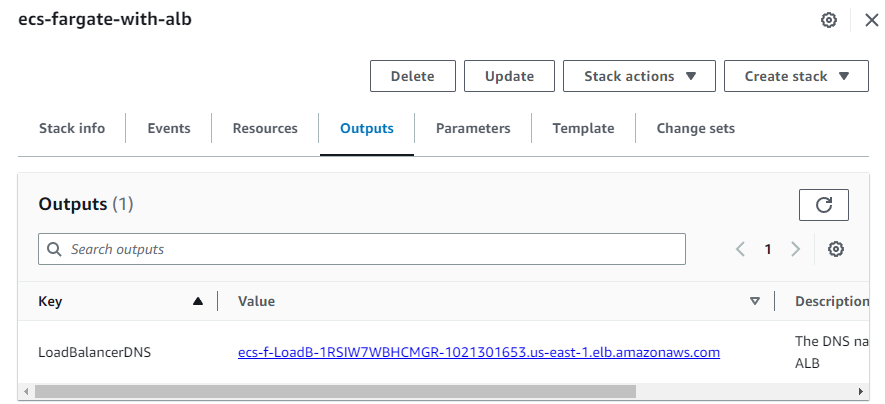
Outputs: LoadBalancerDNS: Description: "The DNS name of the ALB" Value: !GetAtt LoadBalancer.DNSNameNow, let's proceed to create our new stack on AWS. Remember, the complete CloudFormation template is available on Github:
Once the deployment is complete, you can find the DNS of your ALB, reserved for you by AWS, in the Outputs tab of your AWS CloudFormation service:
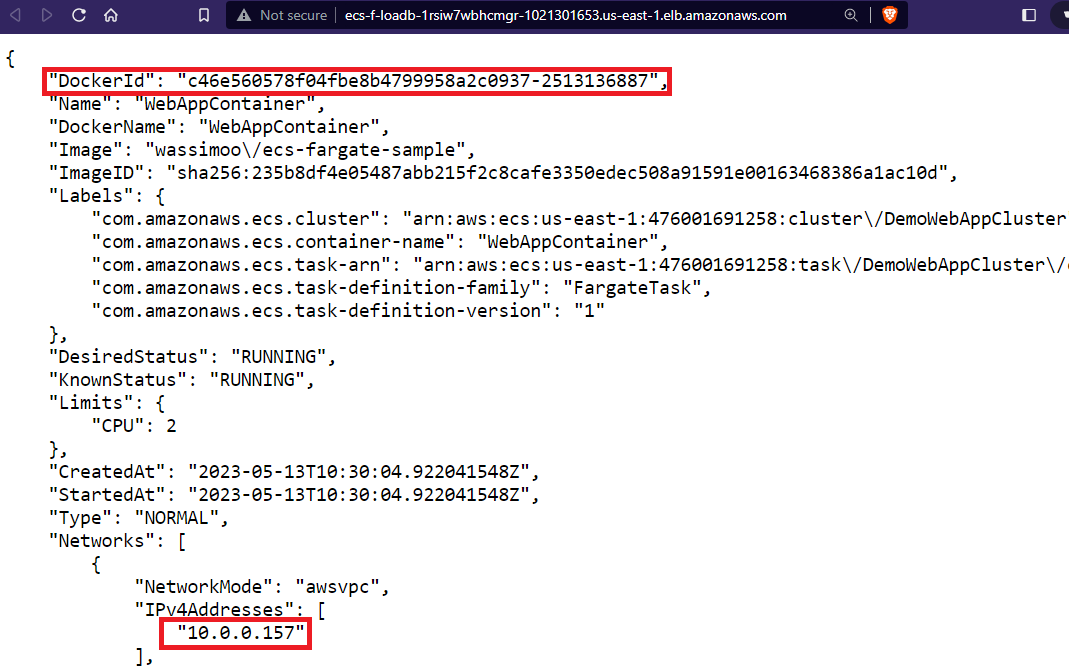
By navigating to this DNS link, you'll be able to view your container metadata:
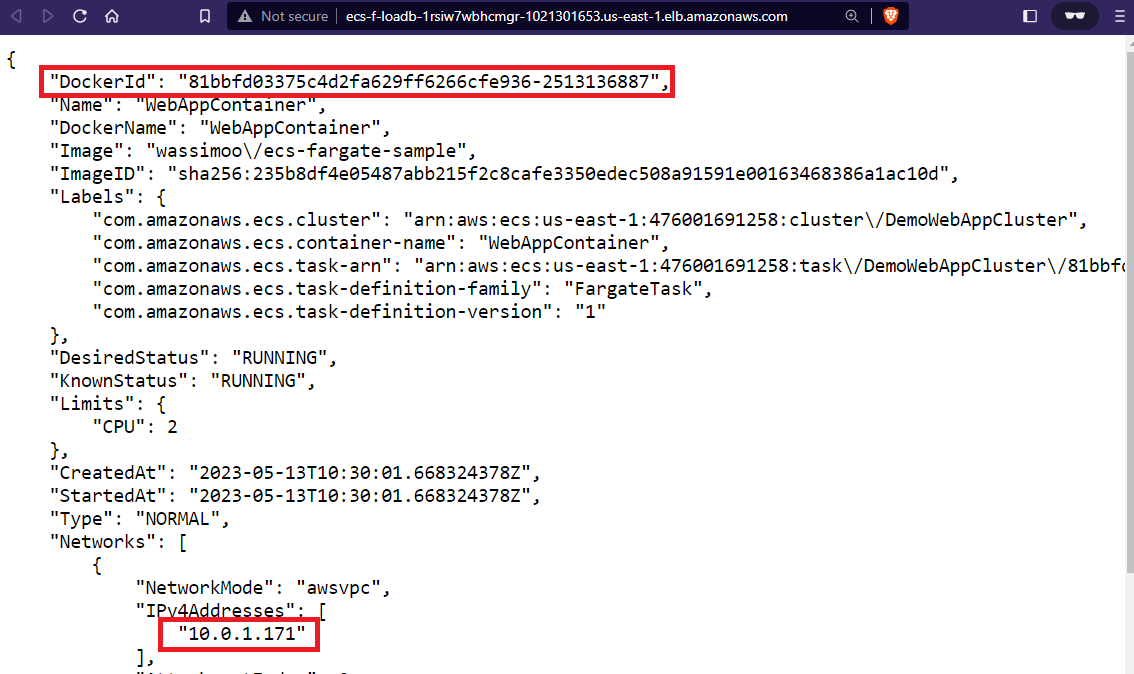
Interestingly, if you refresh the page, you'll observe that both the container ID and subnet change. This behavior signifies that our traffic is being evenly distributed across both containers running in different subnets:
Congratulations! Through the course of this section, we have not only learned to distribute traffic across multiple Availability Zones using AWS ELB but also gained a deeper understanding of AWS ECS on Fargate capabilities. Leveraging these services, we've added an additional layer of high availability to our application and ensured it remains unaffected by issues in any single location. This marks a significant step in building scalable and reliable web applications on AWS.
Conclusion
In conclusion, while AWS Fargate offers many advantages for container deployment, it's important to note that it is not a silver bullet solution that fits every use case perfectly. Here are a few considerations to keep in mind:
- Cost: Fargate abstracts away the underlying infrastructure, providing a simplified and managed experience. However, this convenience comes at a cost as it may be more expensive compared to managing your own infrastructure using EC2 instances..
- Compute Resource Limits: Fargate imposes certain limits on compute resources, such as CPU and memory, which may not be suitable for all workloads. If your application requires high-performance computing or demands specific resource configurations beyond what Fargate supports, using EC2 instances with ECS or other compute options might be a better fit.
Finally, it's essential to evaluate your specific use case and consider the trade-offs before deciding to use Fargate. Understanding the strengths and limitations of Fargate will help you make informed decisions and choose the right deployment option for your containerized applications on AWS.
Happy container deployment! 🎉